I love scarves. They are a great way to extend you wardrobe's possibilities, and they are a way to bring some nice color up close to your face. My favorite scarves are infinity scarves, ones that are sewn into a loop so that you can double them up and drape them in a variety of ways.
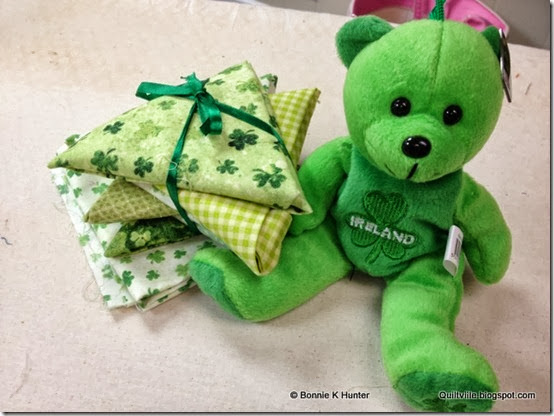
A number of my friends have made scarves. As a matter of fact, my friend Nancy went on a veritable scarf tear a while ago. I resisted for quite a while, but then I found some lovely Kaffe Fassett rayon on etsy, and made this beauty.
I love how soft it is and how nicely the rayon drapes. There will be lots more scarves in my future -- my summer wardrobe really needs updating -- but I plan to use some voile and some lawn as well as more rayon. Here are some instructions I wrote up just in case you aren't motivated to search through the 100's already posted out there in cyberspace.
Infinity
Scarf
1 yard of fabric
The first thing you need to do is
determine how long you want your scarf to be.
The easiest way to do this is to find a scarf you like and measure
it. You might want it to be longer, and
drape over your chest, or you might want it to be shorter and drape close to
your neck. Take the scarf you like &
measure it as it is doubled-up. That is
your scarf length (SL).
You will need 2 strips of fabric
that are SL + 1” X 18”. Sew the 2 strips together, end to
end. Press the seam.
Sew your fabric into a tube by
folding it in half lengthwise and stitching along the long side, beginning your
seam about 3”- 4” from the end & finishing 3”-4” from the other end. If you are using rayon, you will want to pin
generously since the fabric really wants to slip & slide.
Turn the tube to the right
side. Press your seam by putting the
scarf on your ironing board with the seam on top & running down the middle
of the tube. Just iron down the middle
& avoid pressing the sides of the tube.
You want to keep the tube soft, without creased edges.
Make a loop by matching the right
sides of each of the 2 short ends. You
are working in a small space, and the fabric likes to scoot away, so pin
generously. Sew those ends
together.
Flip the end seams to the inside
and press, again trying to avoid making side creases. You can sew the opening closed by hand, or by
machine stitching. I want my scarves to
have nice, soft rounded edges, so I sew by hand to avoid that sharp edge.
Put the scarf on, go look in the
mirror, and admire how special you are; take a picture so you can post it on FB
and brag. Then, because you now realize
how easy this was, go get more fabric & make a whole wardrobe of
scarves!
I had a great experience last night! Lori, my daughter's MIL, has been making/selling her own line of organic, all natural soaps, creams and body butters for a little over a year. She came up with an idea for a home party that I think is unique, and I was part of her test group in her home last night. 10 of us gathered for an evening of lotion making!
First, Lori passed around a basket full of various sample body creams for us to sniff. There must have been 40 of them, and they ranged from sweetly youthful (Strawberry Lemonade) to masculine (Shave & a Haircut), to more subdued and herbal (Lemongrass). We drank wine, sniffed, compared, sorted out, and finally each chose the scent they wanted to use for their cream. We were making 16 oz. each, so the next step was to choose the size bottles we wanted: two 8 oz.; one 8 oz. plus two 4 oz; or four 4 oz. There was even talk of partnering up and exchanging bottles when we were finished so we would go home with a variety.We adjourned to the kitchen, and prepped our individual work stations. Each of us had a measuring cup, an little electric whisk, and a plastic pipette. Lori gave each of us the bottle of essential oil that corresponded to the scent we had chosen. We sterilized our whisks with alcohol while we watched Lori begin to make a big pot of body cream base. All of the ingredients, including almond oil, shea butter and jojoba oil were pre-measured, so the assembly went quickly. As she worked, Lori explained how she became interested in this, and how she went through tons of research and trial & error to develop the recipes she thought worked best. She only uses top of the line, natural ingredients, and the results show the care she takes. Once the base was done (it looked like a a slightly thickened milk), she poured 16 oz. of it into each of our cups. We used the pipette to measure the essential oil, then add it to our cream. The resulting concoction was whisked for about a minute, and poured into our bottles. Lori explained that we needed to take the tops off our bottles when we got home & let the cream thicken overnight.But what is a bottle of wonderful body cream without a label? Lori provided materials for us to use to create our own labels; some of us came up with exotic names, and some of us just stuck with the basics. OK, mine was a mix of coconut and bitter orange, which I named Coq Orange). She had ingredient labels for the back (or the bottom) of the bottle, so we knew just what was in there. We got to pick fabric bags and ribbon trim to carry our creations home.It was a lovely evening! We gave Lori some suggestions on how to make the process work even better than it did, and went home with bottles of high-quality body cream to use ourselves or to give as gifts. She plans on rolling this out as a home party very soon. The cost for each person would be $25, with the hostess being free. During the course of the night, Lori draws names out of a basket for door prizes, and she also brings quantities of her other products for sale. As an aside, once I started using her soaps, I won't use anything else.
If you are interested in a MYOBC party, let me know. It really was a lot of fun. Lori is near Willow Grove. PA. The optimal group size (depending on how much room you have) is probably around 10. The length of the party depends upon the number of participants; ours took a little over 2 hours. Her company is Ethereial Soap Company.


.jpg)


